
How to start a dress rental business on Shopify
By Rakun Digital · Published November 4, 2026 · Updated November 5, 2026
Dress rental is one of the most natural rental businesses to run online. Customers want a designer gown, maternity dress or wedding outfit for one occasion, not forever, and a well-run rental store can earn from the same dress many times over. If you already sell on Shopify, or plan to, you don't need a separate booking website. You can take rental bookings on the product page and let customers pay through the same Shopify checkout they already trust.
This guide covers the practical side of setting up dress rentals on Shopify: rental periods, cleaning time, deposits, pricing and the day-to-day running of bookings. It uses RD Rentals as the example app, but the same planning steps apply whichever tool you choose.
Step 1: Decide how your rental periods work
Before you touch any settings, write down the rules you want customers to follow. These are the most common questions:
- What's the minimum rental? Many dress rental stores offer a fixed window, such as four or six days, so the dress arrives before the event and goes back afterward.
- Do longer rentals cost less per day? Weekend rentals and week-long rentals are often priced differently.
- How much turnaround do you need? Dry cleaning, repairs and postage all take time between rentals.
- Do you take a deposit? A refundable security deposit protects you against damage or late returns.
Step 2: Add your dresses as products, with sizes as variants
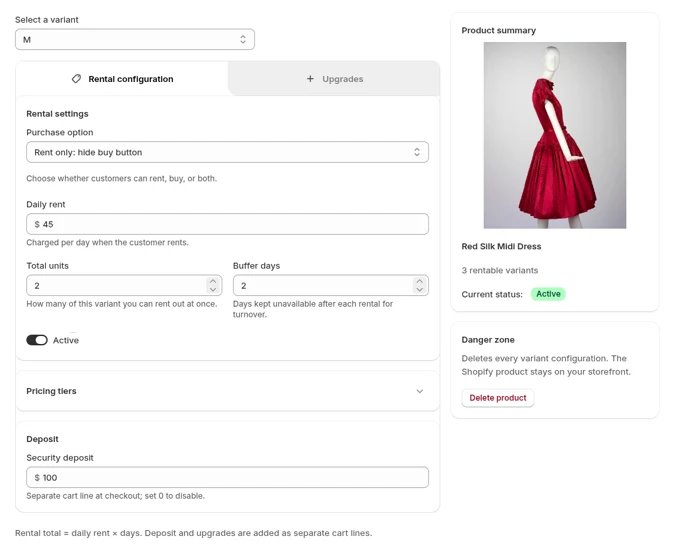
Set up each dress as a normal Shopify product, with sizes (and colors, if relevant) as variants. In RD Rentals, you then turn on rentals for each variant. That matters for dress rentals, because a size 8 and a size 14 of the same gown are physically different items with their own calendars.
For each variant you can set:
- Daily rent: the base price per day.
- Pricing tiers: optional day ranges with a lower daily rate, set as a fixed amount or a percentage of the daily rent. Each day is charged at the rate of the range it falls in.
- Total units: how many of that exact dress and size you own. If you have two size 10s, set it to 2, and both can be booked on the same dates.
- Buffer days: days blocked automatically after each booking for cleaning, checks and postage.
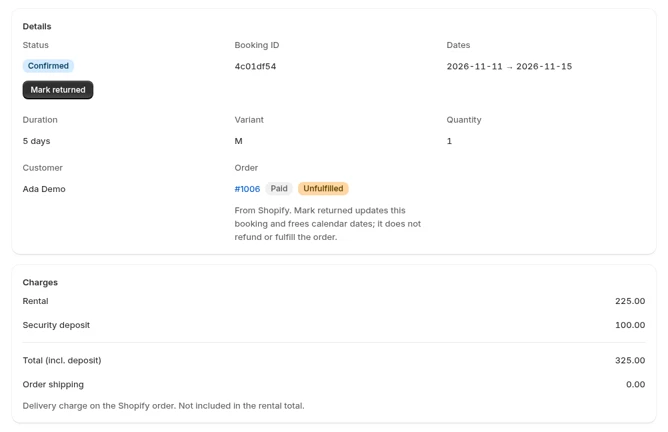
- Security deposit: a refundable amount per unit, charged at checkout as a separate line. You refund it from the Shopify order when the dress comes back.
- Upgrades: optional extras, such as a matching clutch or express delivery.
Rental products sit alongside your normal products, so you can still sell accessories, ex-rental dresses or gift cards in the same store. The full setup guide walks through each setting, and the rental app pricing guide shows what the app costs for your busy and quiet months.
Step 3: Add the rental calendar to your product page
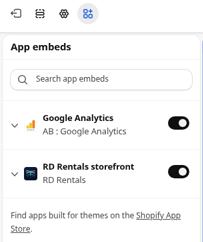
Customers need to pick their dates before they add a dress to the cart. With RD Rentals, you turn on the RD Rentals storefront app embed, or add the Rental calendar block to your product template in the theme editor, then save the theme. No code is needed.
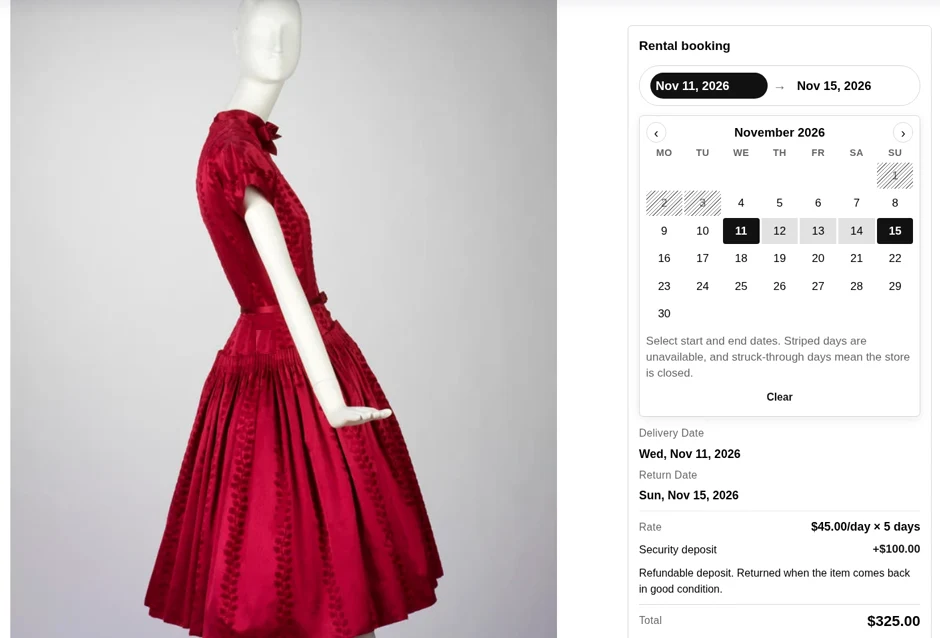
The calendar shows which dates are available, taking into account:
- existing bookings, including unpaid orders that are holding dates
- your buffer days
- any store-wide blackout dates, such as when you're on holiday or doing a stock check
Step 4: Let customers pay in native Shopify checkout
RD Rentals uses Shopify's Cart Transform, so the chosen dates, deposit and any upgrades are carried on the line items, and customers pay in normal Shopify checkout. That means you keep:
- your usual payment methods
- your shipping rates
- your order emails
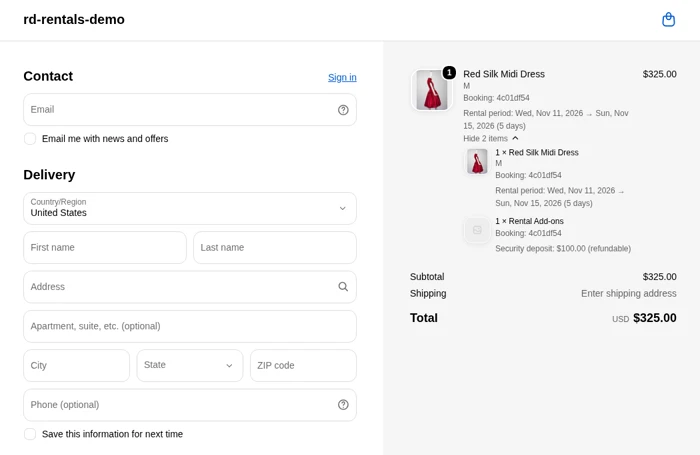
The rental dates are also saved on the order as metafields (rental start and end). You can filter by them in your Shopify Orders list, which is handy when you're packing the week's dispatches.
Step 5: Manage bookings from day to day
Once orders come in, each booking moves through clear stages:
- Awaiting payment. If an order hasn't been paid yet, its dates are held so nobody else can take them, but it isn't treated as a confirmed rental.
- Confirmed. The order is paid, and the dress is reserved for those dates.
- Active. The booking becomes active once the order is fulfilled or delivered.
- Returned. When the dress comes back, choose Mark returned on the booking. If it comes back early, the remaining dates free up for other customers.
- Cancelled. If you cancel the order in Shopify, the booking is cancelled and its dates are released. A refund on its own does not release dates.
Two customers can occasionally book the same dates at almost the same moment, or a blackout can be added after a booking. RD Rentals doesn't create a booking that would overbook. Instead, it sends the order to Needs attention, tags it rd-rentals-conflict, adds a note and, if email notifications are on, emails your store contact address. Contact the customer to offer another size, other dates or a refund, then choose Mark resolved on the Bookings page.
The app dashboard shows this month's bookings and rental revenue, plus confirmed and active rentals starting in the next 30 days.
Step 6: Price your rentals sensibly
A few pricing tips that work well for dress rentals:
- Start from the retail price. Many rental stores charge a fraction of the dress's retail price for a standard rental window. Aim to recover the cost within a realistic number of rentals, after cleaning.
- Use tiers for longer rentals. Customers traveling for a wedding may want the dress for a week. A tier rewards that without lowering your standard price.
- Set deposits by value. A high-end gown justifies a higher refundable deposit than a casual dress.
- Add upgrades. Extras like express return postage or an accessory are easy add-on sales.
What RD Rentals costs
RD Rentals has no monthly fee. The first 10 paid rental orders each month are free, and after that it's $0.50 per paid rental order, billed through Shopify. Orders that are never paid are not billed. You can add as many rental products as you like.
For a new dress rental business that's still building up bookings, this means you don't pay a fixed subscription during quiet months. See pricing for the current details.
What to check before you launch
RD Rentals focuses on online rentals through your Shopify store. At the time of writing, it doesn't include:
- automated reminder emails
- point-of-sale (POS) bookings
- external calendar sync
If you take a lot of in-person bookings at a physical boutique, factor that in. You can keep an eye on new features in what's new.
Before you go live, run through this checklist:
- Every size you rent out is a variant, with the correct number of units.
- Shopify inventory tracking (Track quantity) is off for rental variants.
- The RD Rentals storefront app embed is on and the theme is saved.
- Buffer days cover cleaning and two-way postage.
- Deposit amounts and refund terms are written into your rental policy page.
- Blackout dates are set for holidays.
- You've placed a test order, marked it returned and cancelled it.
Ready to start?
Dress rental rewards careful setup: the right rental window, enough turnaround time and clear deposit terms. Once those are in place, Shopify handles the payments and RD Rentals keeps the calendar accurate.
Install RD Rentals and follow the full setup guide to get your first dress ready to rent. If you get stuck, the RD Rentals docs and FAQ cover the details, and you can reach us by chat on the site.